Showing posts with label Shabby. Show all posts

Tuesday, November 11, 2014

Recycled Salad Bowl Sets


Vintage wooden salad bowl sets make great holiday gift baskets, and there's no shortage of them at yard sales and thrift shops.
Here's a vintage salad bowl set which I recently cleaned, painted, sanded, and stained ~ ready to use as individual holiday gift baskets. I use them to hold gifts of various themes, such as guest soaps & rolled wash cloths, kitchen spices & spoons, or hot cocoa & tea packets with candies, etc. I use cellophane gift basket bags from Dollar Tree & tie with jute twine for fast and easy gifts.


Did you know you can remove grease & grime from vintage wooden wares with baking soda? (Not for use on valuable antiques, of course!) I mix baking soda
& warm tap water to form a thick paste & rub it over greasy wood surfaces, allowing it to dry. After rubbing the paste off with a dish towel dipped in hot water, I put them in a sunny spot to dry. You might want to test a small area before completely covering your wooden wares in baking soda, sometimes this causes the wood to crack. 


For this particular set, I painted the outsides only ~ using various colors of latex flat interior paint, sanded the edges for an aged look, then rubbed oil-based wood stain with sealer over the entire surface including the natural wood interiors.


 redshedvintage.com© copyright 2014


Thursday, August 22, 2013

Trash Talk Thursday: Plastic Prims!


Home parties were all the rage in the 1960's - 80’s, and during that time companies such as Home Interiors produced some great plastic wall décor which were reproductions of antique cast iron or wood plaques. Sometimes labled Burwood, Dart or Homco, these lightweight treasures are plentiful at thrift stores and are easy to upcycle with a little paint. This large patriotic Eagle was a recent $2.00 score.
After lightly cleaning with a damp cloth, I sprayed a light coat of flat black spray paint.

It looked good enough to hang with just the black paint, but I decided to add some patriotic colors. Using Folk Art acrylic craft paint, I applied red, white, blue, and gold paint on the dimensional areas, as shown. When it dried completely, I wiped Minwax Stain & Sealer with a cotton rag and waited a few hours before hanging. If you'll be hanging your painted plastic prims outdoors, a coat of clear acrylic spray will help protect it from the elements.
Check it out! This makeover of mine was featured in the Winter 2011 issue of A Primitive Place Magazine, page 107
© copyright 2011 redshedvintage.com 
Here are some other painted plastic projects of mine, recycled using the same painting method:


Thursday, June 20, 2013

Trash Talk Thursday: Faux Pewter

As featured in my former Trash To Treasure column, Fall 2012 issue of A Primitive Place & Country Journal Magazine (page 101) here is an easy way to fake pewter!
By using paint, I recycled this .50 ceramic 1980’s goose pitcher to what now looks like old Pewter...

 I sprayed a liberal coat of flat black generic spray paint, then added a light coat of Rustoleum Texture spray. When completely dry, I used my electric palm sander with medium grit paper to sand the texture just enough to create what looks like pitting on old Pewter, then painted the entire surface with Deco Art Metallic Dark Patina craft paint (purchased at Michael’s Arts & Crafts). For a darker patina look, I rubbed watered-down black acrylic paint over the ridges with a cotton rag.
This same process also works on plastic, metal, or wood ~ experiment on different surfaces. My own experimentation included plastic disposable serving utensils & spoons ~ the 'pewter' spoons came out looking just like the real thing for displaying on a spoon rack! 
(Note: once painted, wares are for decorative purposes only; not for food or beverage use)


Thursday, June 13, 2013

Trash Talk Thursday: Shake It Don't Bake It Prim

 
With a can of flat black spray paint and a plastic bag of ground spices, almost anything can be made prim. Even plastic perfume decanters such as these baby shoes, a .25 yard sale find.
After wiping clean with a damp rag, I waited until the shoes were dry before spraying a light even coat of Walmart’s $1.00 flat black spray paint. When dry, I placed one shoe at a time into a Ziploc bag half full of cinnamon, ginger, and allspice (all purchased at Dollar Tree) sealing the top before shaking & rubbing the spices over the painted finish, as if breading a chicken leg with Shake & Bake for oven-fried cooking. When the surface was well coated, I shook the excess spice mixture over the bag. The bag of spices can be used over & over again! This process also works well for transforming other surfaces which will be used for display only, including wax, metal, wood, plaster, glass, ceramic, clay, plastic, fabric, and even paper. Just think of all the recyclable junk you can shake prim!
copyright 2013 www.redshedvintage.com


Thursday, May 30, 2013

Trash Talk Thursday: Repurposed Planter Dough Box


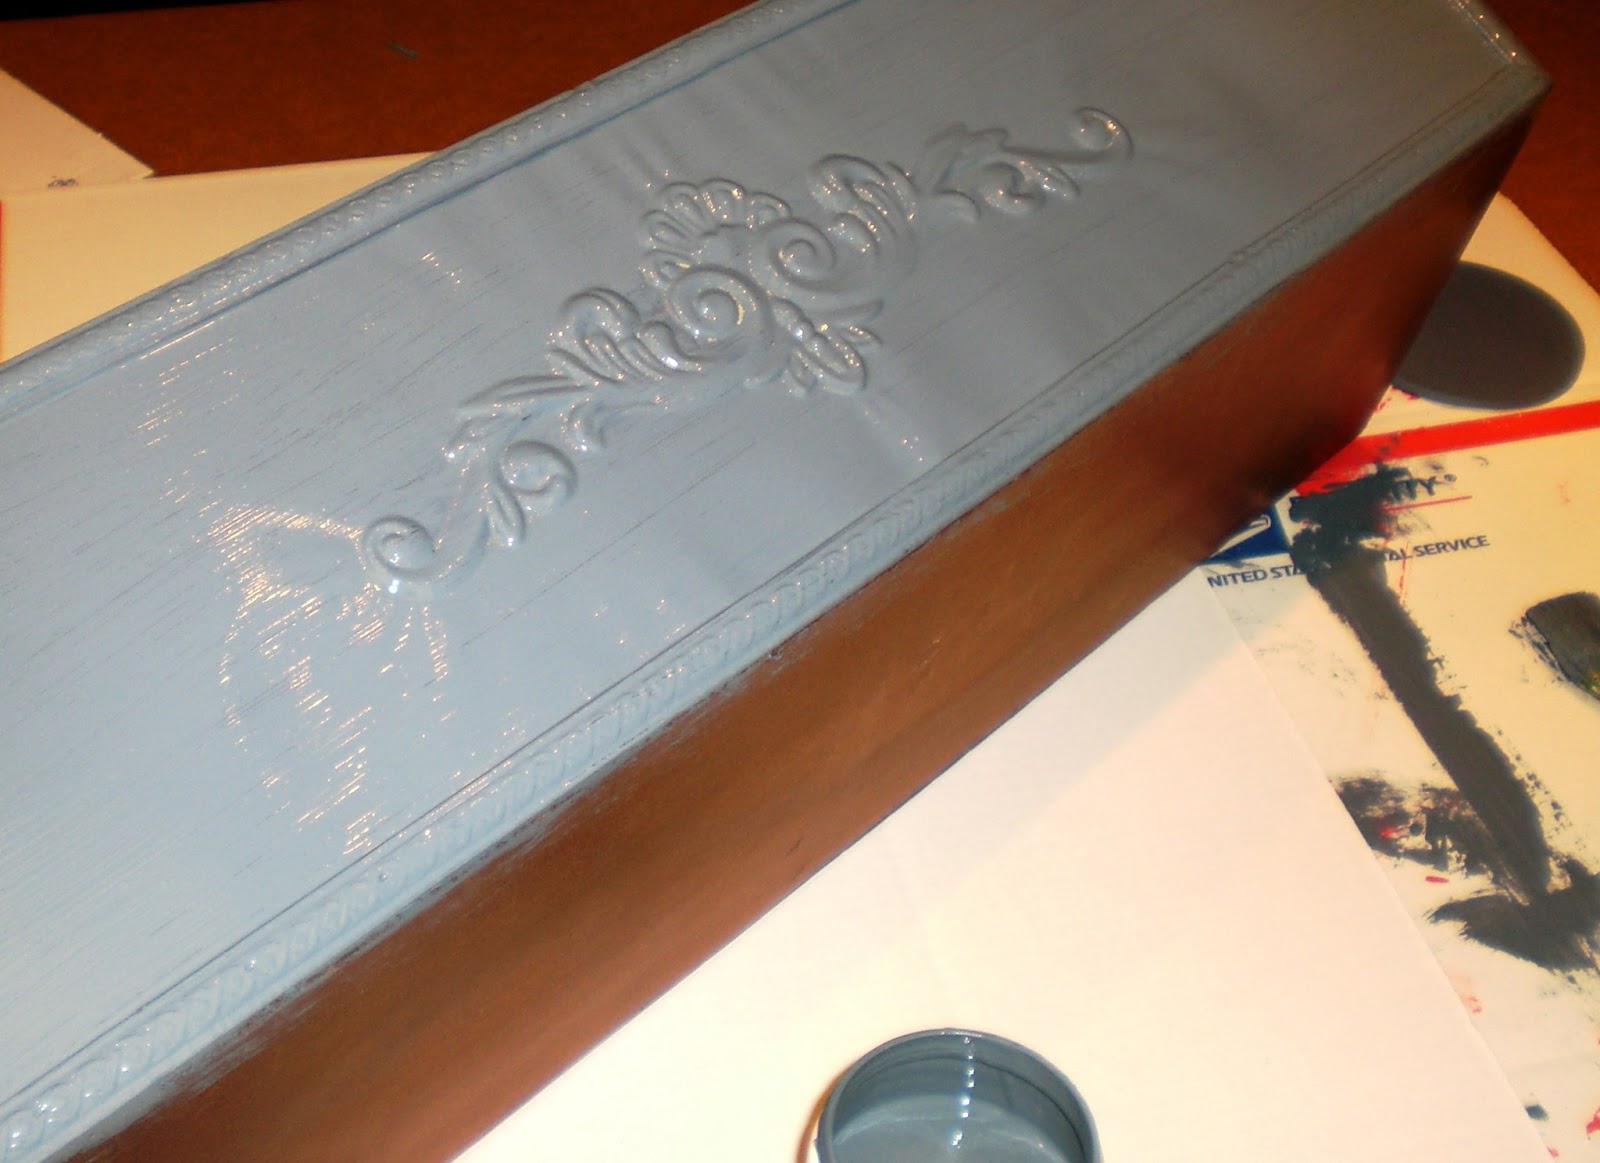
While antique dough boxes are great for displaying wooden bowls, a modern day planter can be a much cheaper alternative for those of us on a tight decorating budget! This newer wooden plant tote box was a $2.00 thrift store find, just the right size for my collection of farmhouse dough bowls.
While the sides of this wooden box were already embellished with embossed metal panels, a carved wooden applique/onlay can be glued to any planter box for an artistic touch, available at most home improvement, hardware, or craft supply stores.


Using a $1.00 can of 'oops' mistinted flat blue wall paint sample from Home Depot, I brush painted 2 coats over the entire surface, allowing 1 hour drying time between coats.


The next day, I very lightly sanded the edges with a piece of fine grit sandpaper to add an aged primitive look, dusting the excess powder with a dry rag. As a final finish, I dipped a clean cotton rag in Ace Hardware's oil-based Walnut wood stain, rubbing an even coat over the entire surface & allowing a couple of days drying time before using.

copyright 2013 www.redshedvintage.com


Wednesday, May 22, 2013

Trash Talk Thursday: Ring of Love Wreath

Wedding season is approaching, so I'll feature some uniquely inexpensive wedding décor and gift ideas in the next few weeks!
(Last week was our big moving day, so I skipped Trash Talk Thursday due to all the extreme activity going on)

I found a couple of large unpainted 1980's wooden heart wreaths at a thrift store last year for $2.00 each ~ what a great score if only for the cost of the chunky wooden hearts! Since it wasn't near Valentines Day at the time, I painted & sold them in my Etsy shop as wedding décor. Each heart wreath was lovingly handcrafted, constructed of layered thick & solid wooden hearts overlapping each other and nailed together to form a ring of love. They measured 21" round x about 2" deep and weighed over 5 lbs. each!
To create your own circle of hearts, simply overlap heart shaped wooden or cardboard cut outs to form a circle (use a round object to make a circle template, if needed) and attach the hearts with glue or nails. I painted mine with red craft paint over black, but you could also paint each heart different colors for a patchwork effect. I also rubbed glossy walnut wood stain sealer over the hearts with a dry cotton rag once the paint had dried, for indoor or outdoor use.
Heart wreaths are great décor for engagement parties, weddings, or year around décor. They can hang on the wall or door, or can be used flat as a table centerpiece or with a floral/candle arrangement. You can also add assorted photos of the bride & groom on each heart for a personalized gift! 
copyright 2013 www.redshedvintage.com


Wednesday, May 1, 2013

Trash Talk Thursday: Repurposed Desk Organizers

Humans often feel the need to organize their workspace, sometimes by purchasing even more clutter in their efforts to organize the existing clutter ~ as a trip to most thrift stores will attest to. Desk organizers are also great for stashing stuff in most any other room ~ TV remotes in the living room,  garden supplies in the shed, art supplies, tools, kitchen gadgets, recipes, booklets & pamphlets to name a few.
Here's a cast-off Pottery Barn organizer which I found for $1.99 at the Salvation Army Thrift Store, a bit beat up but constructed very well of solid wood...
After a coat of flat green wall paint with lightly sanded/distressed edges and a cloth-rubbed coat of walnut wood stain, it was ready for displaying some photo props by the back door!  Complete directions for how to paint/distress vintage wares can be found on my youtube tutorial by simply clicking here.
Here are photos of some of my other repurposed desk organizer projects...


Add caption


copyright 2013


Wednesday, April 10, 2013

Trash Talk Thursday: Mint It in Minutes

Minty shades of green are so cheerful. Whether you like primitives, farmhouse, cottage, shabby chic or whatever your home decor style preference, minty greens always look right at home. Right up there with the color red, shades of jade are some of my favorite colors to work with.
This inexpensive newer apothecary/bathroom cabinet ~ made of white coated particle board ~ was quickly transformed with just 2 quick coats of flat Jadeite wall paint, some fine grit sandpaper, and a hand-rubbed coat of walnut wood stain. copyright 2013 www.redshedvintage.com


Before ~ inexpensive Salvation Army Thrift Store bathroom cabinet find
Here's another minty do-over (photos below) and a link to directions for painting/distressing on: my painting tutorial on youtube ~ which also featured a minty makeover. Have a great week, fellow junquers!
Before


Wednesday, April 3, 2013

Trash Talk Thursday Tutorial: Painting & Distressing Vintage Furniture

If you've been wanting to revive some scratched up old furniture but thought you needed fancy paint products or kits, read on!
As we prepared to move into a bright new townhouse, I had decided it was time to do some furniture painting of my own. First on the list was reviving the scratched up hand-me-down 1950's 4-piece bedroom furniture set! 


 Inexpensive items used for my overhaul:
Flat charcoal wall paint ($3.00 gallon 'oops' paint from Walmart, even better!)
Ace Hardware Oil Based Wood Stain & Sealer
Paintbrushes, cotton rags

If you don't know whether or not your furniture piece is a valuable antique, you might want to get some advice from a professional antique dealer before painting or altering the finish. Some clues as to an item's age can sometimes be found on the back or bottom of the piece, in the form of a furniture company or store sticker, stamp, or product #. Machine or factory manufactured furniture pieces usually have some sort of company logo. You might also notice square/rectangular old nails instead of newer round nails in the joints; phillip's head screws instead of flat ones; or note whether the drawers were machine or hand dovetailed to better guess an item's age. Until the1880's, dovetailed corner joints were hand cut with chisel and hammer (crooked, with cuts varying in size & shape, not uniform.) After the 1880's, many furniture companies mass-produced furniture with industrial machines, including machine-cut dovetailed joints (uniform in size & shape.) Keep in mind that machine dovetailed pieces are still being made nowadays, even some inexpensive Ikea products have machine dovetailed edges. Here are 2 dovetailed drawer examples:
Hand dovetailed antique 1800's drawer joint (left) and machine dovetailed (right) vintage 1950's drawer joint

Once you've determined that your furniture isn't a rare priceless antique, wipe the surface with a lightly dampened wash cloth to clean for painting, and allow the surface to dry. I like using flat wall paint because I prefer a non-shiny surface, but you can test whatever paint you'd like to use on a small area. Decide whether you want to remove the hardware to retain the original finish, or leave it on for painting. I liked the patina on the brass drawer pulls, so I removed them & soaked in warm water with a little squirt of dishwashing soap.


Using a paintbrush, apply 2 light coats of paint in the same direction ~ allowing drying time between coats. When paint has completely dried, you can add some distressed age if you'd like ~ either by hand or with an electric mouse sander ~ using fine grit sandpaper (skip this step if you'd prefer a neater look). Wearing a painter's mask & protective eye ware, lightly sand around the edges and/or where ware would be most likely to occur naturally from years of use.

Once you're happy with the distressed finish, very gently wipe the dust with a slightly damp cotton rag, using single strokes to avoid lifting the paint off the surface. If you find that you've rubbed too vigorously, stop and add some paint over the peeling paint, allowing time for the patched areas to dry.

Once the piece is dry and free of debris, you can seal & darken the finish by applying a hand-rubbed coat of oil based wood stain. I prefer to use 'natural' colored stain over dark paint colors, or 'walnut' over light paint colors; experiment on a paint stirrer to see which you prefer. Wearing gloves, dip a clean (lint free) cotton rag into the stain, then apply even strokes in the same direction over the painted surface. You might want to use a small paintbrush, sponge, or q-tip to get the stain into crevices and corners. Wipe excess stain, and allow a few days drying time ~ preferably somewhere with low humidity. Reattach hardware, and enjoy several more years of use! If you decide you don't like the color or finish, just start all over again with a different color. (Note: for my video tutorial showing this process on a much smaller project, click here)


As someone who usually paints/distresses/antiques vintage primitives of a much smaller nature, I must say that I have a newly gained appreciation for those who refinish big furniture for a living! Between lugging the pieces back and forth to my workshop and crawling around on the concrete floor to paint & stain, I'm feeling mighty sore after just this one set of furniture.
I even treated myself to a manicure when the hefty chore was finally finished ~ can you guess what color nails I chose?  Have a great week, everyone...
Trash to Treasure fingers, aaaah
 
 
 Some other painted furniture projects I tackled:
Reproduction 1950's hurricane table before

After!


Reproduction dry sink before


After!


Dough box end tables updated with blue bottoms